
How to Fix if the Rivet Gun Can’t Be Clamped – Complete Trouble shooting Guide
A rivet gun that cannot clamp rivets normally will slow down your riveting work . This issue happens frequently on manual, electric and pneumatic rivet guns after long-time use.
In this guide, we will list all possible causes and share practical step-by-step repairs. You can solve rivet gun clamping problems by yourself without sending the tool for professional repair.
1. Common Reasons Why a Rivet Gun Fails to Clamp Rivets
Before repair, figuring out the root cause can save you much time. Most clamping failures come from the following 5 situations.
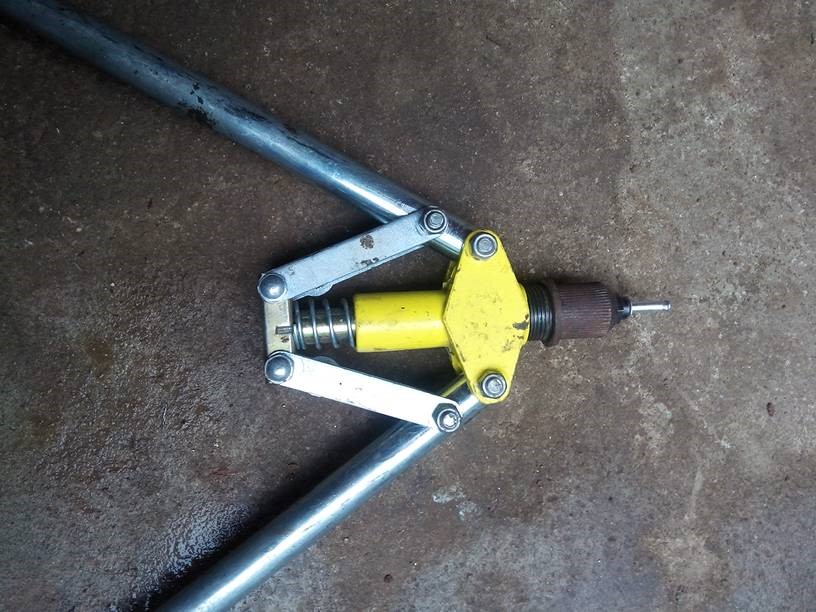
1.1 Dirt, Metal Chips and Debris Blocking the Clamp Jaws
During riveting, metal shavings, dust and tiny scraps will accumulate inside the clamp jaws. These foreign objects prevent the jaws from closing tightly, so the rivet cannot be gripped firmly. This is the most common and easiest problem to fix.
1.2 Worn or Damaged Clamp Jaws
The clamp jaws are the core part to hold rivets. After thousands of times of use, the tooth surface of jaws will wear smooth, crack or deform. The friction drops sharply, leading to slipping when pulling rivets.
1.3 Loose Screws and Loose Head Assembly
Continuous vibration during work will loosen the fixing screws on the gun head. Once the head assembly becomes loose, the clamp jaws cannot align and close completely, resulting in poor clamping performance.
1.4 Weak or Broken Internal Spring
The internal spring provides clamping force for the jaws. If the spring loses elasticity, deforms or breaks, the jaws will not reset and close tightly. You will feel obvious lack of force when operating the rivet gun.
1.5 Power/Pressure Issues (Electric & Pneumatic Rivet Guns)
For electric rivet guns, insufficient battery power or damaged transmission gears will reduce clamping force. For pneumatic models, low air pressure, air leakage or blocked air pipes will make the jaws unable to work normally.
2. Preparations Before Rivet Gun Repair
Prepare simple tools and follow safety rules to avoid injury or secondary damage.
2.1 Tools You Need for Maintenance
You only need daily hand tools: screwdriver, hex key, small brush, compressed air can, fine sandpaper and lubricating oil. For replacement parts, prepare new clamp jaws or springs according to your rivet gun model.
2.2 Safety Tips During Disassembly & Repair
First, cut off power or disconnect the air source completely. Wear gloves to avoid scratches by sharp metal parts. Place small screws and accessories in a clean container to prevent loss.
3. Step-by-Step Solutions to Fix Rivet Gun Clamping Issues
Follow the order from simple to complex to repair your rivet gun.
3.1 Clean Debris from Clamp Jaws (First Quick Fix)
1. Open the rivet gun head and expose the clamp jaws.
2. Use a small brush or compressed air to blow away all metal chips and dust.
3. Wipe the jaw surface with a clean cloth.
4. Test the rivet gun. In most light blocking cases, clamping function will recover immediately.
3.2 Tighten Loose Screws and Head Components
1. Locate all fixing screws on the gun head and outer cover.
2. Use a matching screwdriver or hex key to tighten all loose screws clockwise.
3. Check whether the gun head shakes when moving. If no shaking, the assembly is stable.
3.3 Adjust or Replace Weak Internal Spring
1. Disassemble the outer cover and take out the old spring.
2. If the spring is just loose, adjust its position to restore elasticity.
3. If the spring is deformed or broken, replace it with a new spring of the same size.
4. Reinstall and test the clamping force.
3.4 Repair or Replace Worn Clamp Jaws
1. If the jaw surface is slightly worn, use fine sandpaper to polish the tooth surface to increase friction.
2. For severely worn, cracked or deformed jaws, directly replace with original matching clamp jaws.
3. Install new jaws and ensure they can open and close flexibly without jamming.
3.5 Fix Pressure & Power Problems for Pneumatic/Electric Rivet Guns
- · Electric rivet gun: Fully charge the battery first. If the problem remains, check and lubricate internal transmission gears. Replace damaged gears in time.
- · Pneumatic rivet gun: Keep air pressure between 0.5–0.7 MPa. Check air pipes and connectors for air leakage, and clean blocked air channels.
4. Troubleshooting by Rivet Gun Type
Different types of rivet guns have targeted solutions.
4.1 Fix Manual Rivet Gun Can’t Clamp
Manual rivet guns mostly fail due to dirt, loose screws or spring fatigue. Focus on cleaning, tightening screws and replacing the spring. No complex circuit or air system maintenance is needed.
4.2 Solve Electric Rivet Gun Clamping Failure
Besides jaws and springs, pay more attention to battery health and internal gear set. Long-term over-discharge will damage the battery and cause insufficient output force.
4.3 Repair Pneumatic Rivet Gun Not Gripping Rivets
Air pressure and air tightness are the key. Always keep standard working air pressure, and regularly maintain the air valve and sealing rings to prevent air leakage.
5. Daily Maintenance to Avoid Clamping Problems
Good daily maintenance can greatly extend the service life and reduce failures.
5.1 Regular Cleaning After Each Use
Clean metal scraps inside the gun head and jaws right after work. Do not let debris accumulate for a long time.
5.2 Lubricate Moving Parts Properly
Add a small amount of lubricating oil to jaws, springs and movable parts every 1–2 weeks. It keeps operation smooth and reduces wear.
5.3 Match Rivet Size with Rivet Gun Specification
Do not use oversized or undersized rivets. Mismatched size will not only cause clamping failure, but also accelerate jaw wear.
6. When You Need to Replace the Entire Rivet Gun
If you have replaced jaws, springs and repaired power/air system many times, but the rivet gun still cannot clamp normally, or the main body is severely deformed and cracked, it is recommended to purchase a new professional rivet gun. Continuing to use a faulty tool will affect work quality and safety.
Post time: Jun-14-2026